MUSC 116
MIDI GUIDE For Reaper
and your Computer
MUSC 116
Easiest Recording of MIDI | Playing MIDI | Creating and Editing MIDI (optional) | Recording MIDI | step by step set up (My Old PC laptop)
Easiest, Fail Safe Recording of MIDI
This is the "fail safe" option. You will need two programs working at the same time to do this.
1) Open Reaper and create a new track.
2) Arm the track.
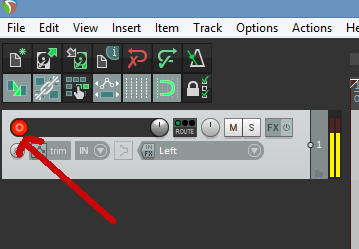
3) Test that Reaper hears your microphone. Make some noise. You should see the volume indicator moving indicating sound.

If you have sound, then go to step 5. If not, go to step 4.
4) For that track select “Options-->Preferences (bottom of drop down menu). Select Audio, Device, Input device. Choose your microphone.
5) Press record on the transport.

6) Play the MIDI file in Aria Maestosa or another MIDI player.
7) End the Reaper recording (and disarm track) when it is done.
See this video for help:
MAC: Recording MIDI in Reaper (Playing MIDI with QuickTime Player) (3 min.) Flash (flv)| Real Player | mp4 |
Pathway: MIDI file played on computer-->Reaper hears with microphone--> records on Reaper track.
Playing MIDI on Your Computer
Aria Maestosa will play MIDI files. This is generally the easiest to do. Just play the file in Aria Maestosa.
OR
Almost all computers today come with a sound card and software that will play MIDI files. Locate the file on your computer and then select it. This will launch a program that will play the file (Normally Mac users QuickTime Player, PC users Windows Media). Make of note of the program that plays your file.
Pathway: MIDI file on computer-->Software Program and Sound card-->Computer speakers.
Playing MIDI in Reaper (Best Quality)
Open Reaper, Insert-->Media and then select your file on your computer hard drive. The MIDI tracks will now be generated and you will see them in Reaper. (See Reaper User Guide 3.29, Importing Media)
Be certain that your initial sound configuration is properly set in
Reaper. Go to Options and open that window. Take a look at the Audio
Device. Is there an output listed there? If not open the window and
select one. If there are several choices, you might need to test each
one. Next there is another setting in the Options window. Go to Audio
MIDI devices. See if you can set your sound card here.
Step by step information from my PC laptop
(For further details see: Audio Hardware set up www.cockos.com/wiki/index.php/Tutorial_2_-_Audio_Hardware)
Option 1 (Best).
This will have the MIDI file played with your sound card, giving you General MIDI instruments.
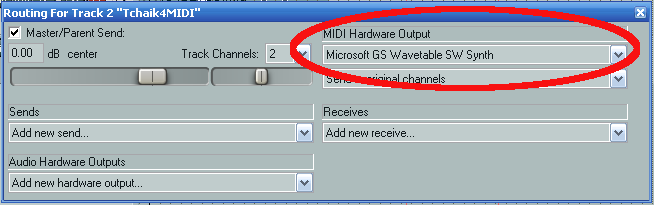
On the MIDI track select the “io” input/output button. Under “MIDI
Hardware Output” select your sound card. Mine happens to be “Microsoft
GS Wavetable Synth.” Your MIDI track should now sound. You will need
to do this for every MIDI track in Reaper.
Pathway: MIDI file on computer-->Reaper--> Software Program and
Sound card-->Computer speakers.
Option 2. This will not produce all of the MIDI instrumental sounds.
Also this method is not allowed for assignments in the course.
This will use ReaSynth to play the MIDI file.
On the MIDI track select the “fx” button. Look for VSTi ReaSynth (Cockos) and select it. You can adjust the ReaSynth settings to modify the sound, but basically it will sound like an organ.
Further information:
LECTURE: Playing MIDI in and outside of Reaper (4 min.) Flash (swf) | (iPod (mp4, small) | iPod (mp4, large) | TEXT
Pathway: MIDI file on computer-->Reaper--> Reasynth-->Sound
card-->Computer speakers.
________________________________________________
Creating MIDI in Reaper (optional)
Optional LECTURE: Creating MIDI in Reaper with Virtual Keyboard (4 min.) Flash (swf)| Windows Media Player | iPod (small, m4v)
Editing MIDI in Reaper (optional)
For MUSC 116 we only work with one file for a single assignment
(Composition 2). You are free, of course, to do more.
Double click on the MIDI track to open the MIDI editing window. Choose
view-->piano roll. Adjust the length and pitch of notes here.
Optional LECTURE: Adjusting MIDI in Reaper (8 min.) Flash (swf)| Windows Media Player | iPod (m4v)
Optional LECTURE: MAC (and PC): Modifying MIDI in Reaper (5 min.) Flash (flv)| Real Player | iPod (mp4) | TEXT
Advanced Users Only: Use your external MIDI device. See Reaper User Guide, Chapter 12
________________________________________________
Recording MIDI in Reaper With a PC. (Best option is #1)
Use options 1 and 2 under “Playing MIDI in Reaper.”
You must have completed all of those steps successfully for this to work.
Select “Options-->Preferences (bottom of drop down menu). Select Audio, Device, Input device. You will probable have a couple of options here such as your computer microphone and sound card. Choose your sound card or “Stereo Mix.” You might need to experiment with the given options.
Create a new track. Select the track. Arm the track. Play the MIDI file. You should see the volume meter moving. If not, repeat the prior steps in “Options.” If all is good, record the MIDI file.
Pathway: MIDI file on computer-->Reaper MIDI track-->
Reasynth-->Sound card-->New track in Reaper
Save the recorded track (.wav file).
________________________________________________
Step by step information from my Old PC laptop
Notes on Getting Sound from a MIDI file to the Master in Reaper
The steps need to configure a sound card for MIDI recording are
similar to those taken in the Reaper User Guide.
Remember MIDI is a series of commands NOT sounds. Therefore for MIDI to be recorded the MIDI data needs to be played by MIDI instrument or a sound card and then the audio sent back to Reaper. The set up for recording a MIDI file in Reaper is therefore more difficult than for mp3 or wave files.
Here is a way to think of the path to get the MIDI file in a Reaper track to the Master track and thus to the final mix:
MIDI file to Sound card-->back to a new track in Reaper--> Master track
An mp3 or wave file in a Reaper track has this path:
mp3 or wave -->master track (Pretty simple, huh?)
So for MIDI to work in your Master Track you need to properly configure the sound card AND the tracks to both send and receive MIDI and the final audio output.
Steps to setting up your sound card to send a signal back to Reaper.
The exact method required will depend on your hardware setup, including your sound card. Your sound card will be provided with some sort of software for changing its settings. This may or may not have its icon within the Windows Control Panel.
These are the steps:
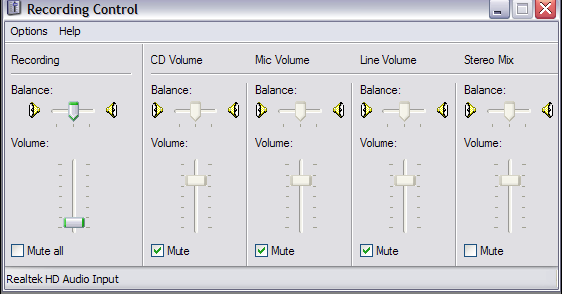
1. Access your sound card's control software and ‘modify its settings to select (depending on the options available) either Stereo Mix or What You Hear.
Shown below is an example of the settings for a Realtek sound card. In this example, input from all, other sources (Microphone, Line, etc) has been temporarily disabled. (A Reaper User Guide)
1. Dr. Ewell had to select this on his Old PC using Windows XP this
way.
Start-->Control Panel -->Sounds and Audio Devices. Then this
window appeared:
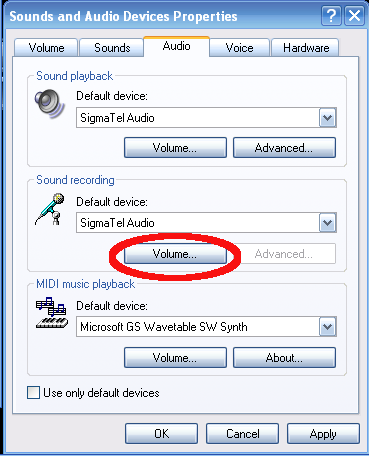
NOTE: the audio device in the “Sound Recording” window must be the same as the device specified in step 4 below.
2. Dr. Ewell selected the sound card in “Sound Recording” and then selected volume. Then this window appeared:

3. Dr. Ewell then selected the “stereo mix” track.
Steps to Setting Up Reaper
4. The next step may require a little experimentation. Depending on the equipment you are using, it might be necessary to change your Options, Preferences, Audio, Devices settings to Direct Input. An example is shown here. (A Reaper User Guide)
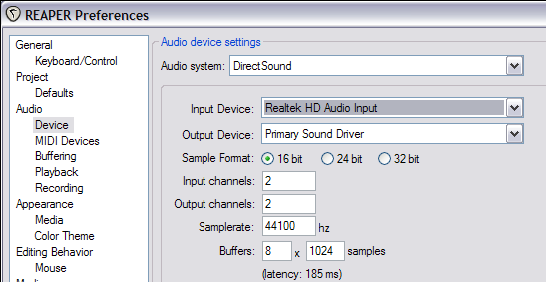
Here is how Dr. Ewell set up his version of Reaper:

5. Create your MIDI track (Insert—Media file) . In the I/O window for the MIDI track set the output to your sound card:
6. Create a new track which you will record the MIDI file to. (for example, Track 2).
7. Arm your new track for recording and make sure to select the correct input (press “in” and then monitor input and select Record Input, Mono Input Left).
8. Press Ctrl R (or the Record button on the transport) to start recording. Stop (space bar) when done.
If you don’t see the new track responding to the changes in sounds, experiment some more with the “Input Device Setting” in step 4. If the new track has recorded the sound you are set!
9. Save the file (here a wave file, .wav) when done.
IF THIS DOESN'T WORK GO TO: Fail Safe Recording of MIDI
header graphic from:
http://www.freewebheaders.com/technology-industry/audio-video-headers/
Copyright 2016 by Terry B. Ewell.